Fixing Sonny's feet, From Foundered to Fixed


Fixing Sonny's Feet, From Foundered to Fixed


Friday, September 27, 2013

Is It Time Yet? or Are We There Yet?


The time has come to start leaving a tiny bit of wall as a trial to see if it will help develop sole thickness.
 
Cresentric Sole Shape

Previously I have had to take off all the wall thickness plus more around the toe to get rid of the long toe.

However now that it seems I have achieved the desired result to steepen the dorsal wall, I now turn my attention to thickening the sole.

This is how I see the way the sole thickens:-

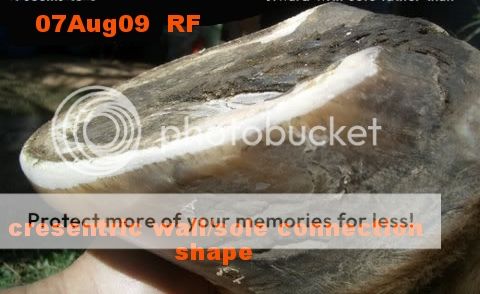
The sole is contained within a boundary created by the wall. As Linda Harris explained it in one her videos, the sole forms a cresentric shape where it connects to the wall. The sole pushes up against the wall & because the wall is strong enough & steep enough, it resists the forward push, instead forcing the wall to buckle a little where it connects to the wall. That buckling becomes the “Sole Stay” cresentric shape.
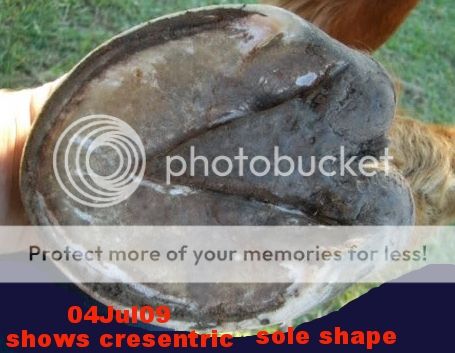
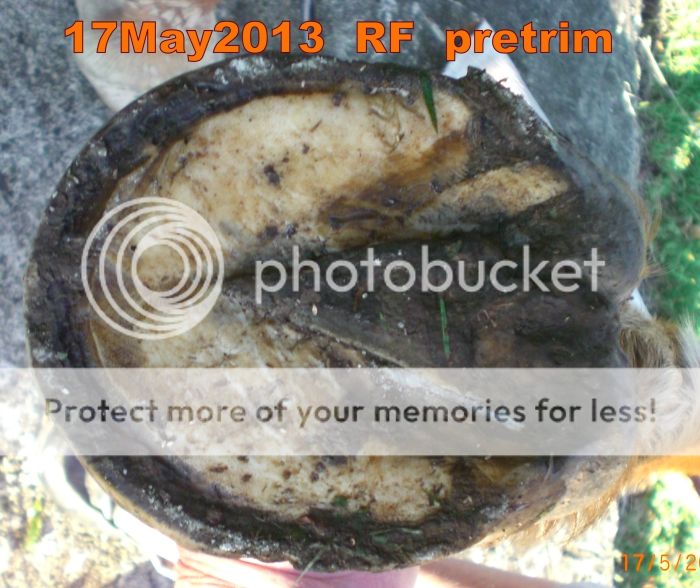
 Here are 2 old photos of Sonny’s feet from 2009 showing the cresentric shape at the sole/wall connection. Ignore the other pathologies. We are just looking at the ridge around the inside at the wall/sole connection.


Now with the benefit of 20/20 hindvision & a very sharp learning J-curve I see I had several opportunities to correct his feet all those years ago. Unfortunately without the right information that I was asking for those opportunities were lost.
 I’ll talk about those lost opportunities in future posts.
 So back to the current trim.
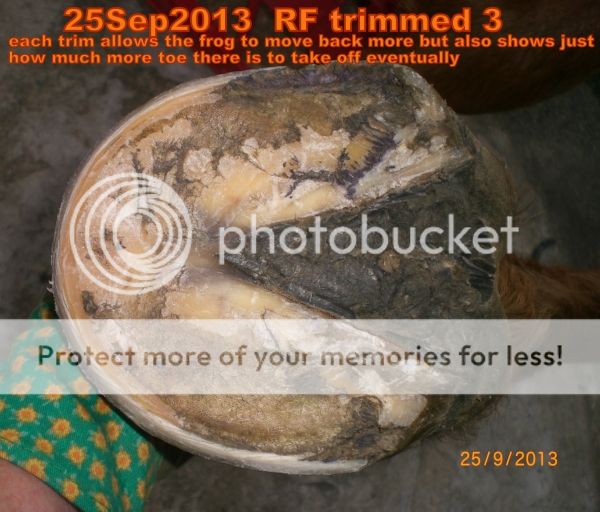
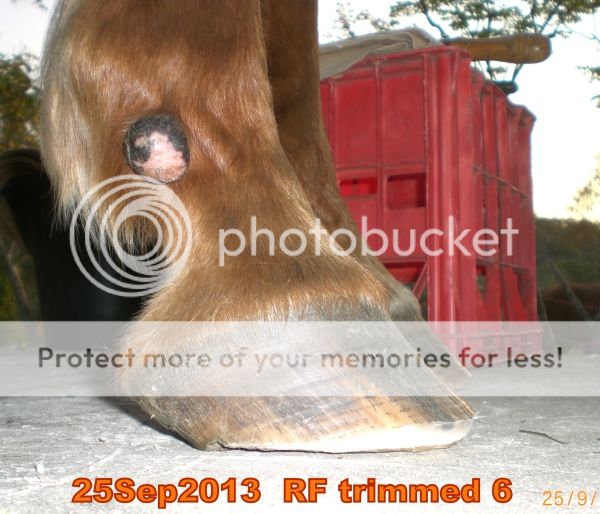
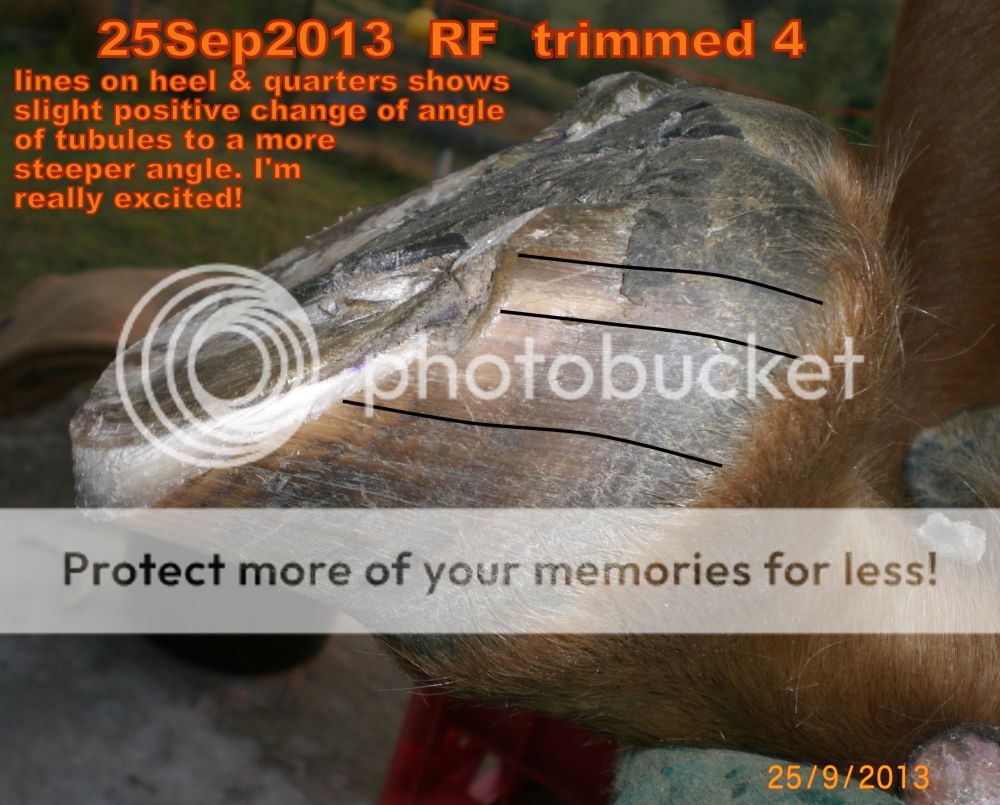
Once the dorsal wall is steep enough, it can withstand the forward push of the sole & heels which is driven by every step. The heels still have to join in the steepening but I can see the tubules are beginning to change direction although it maynot be all that clear in the latest photos.
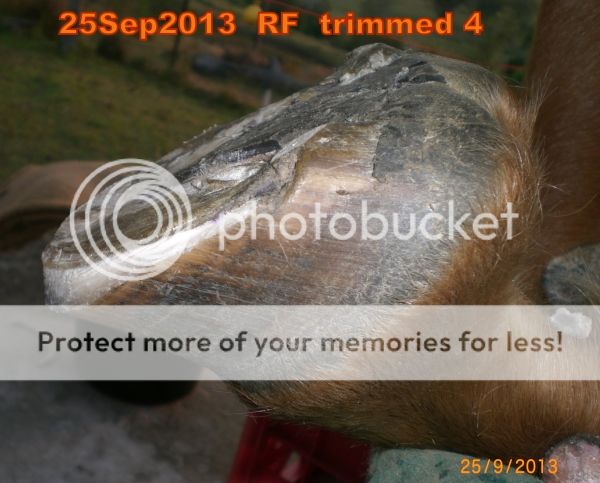
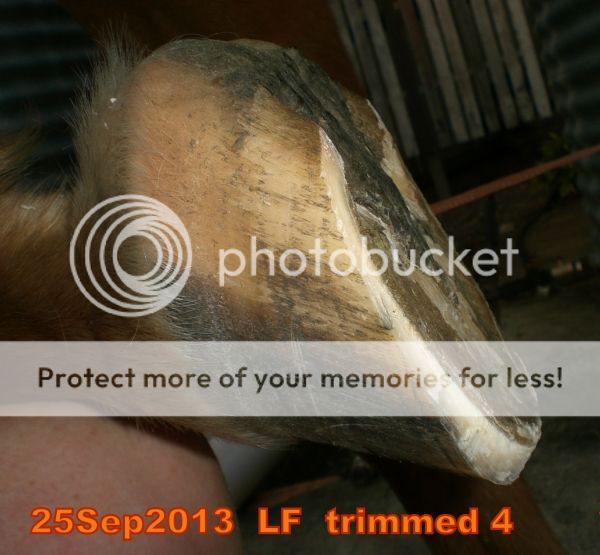
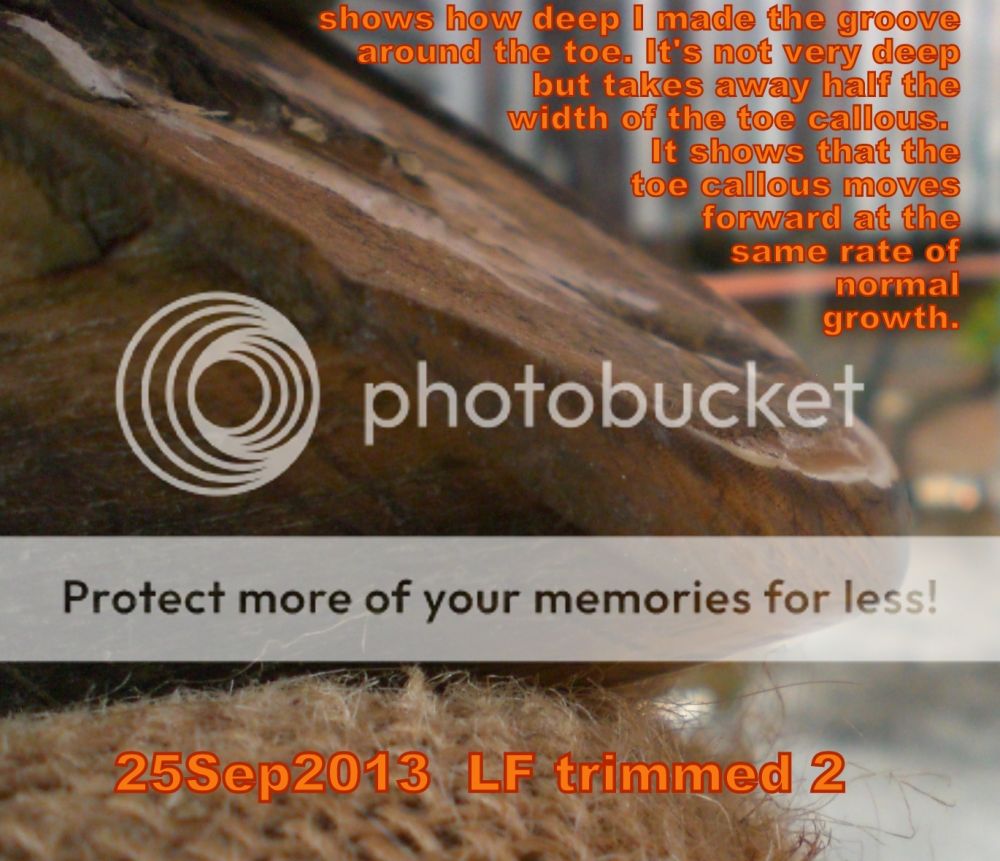
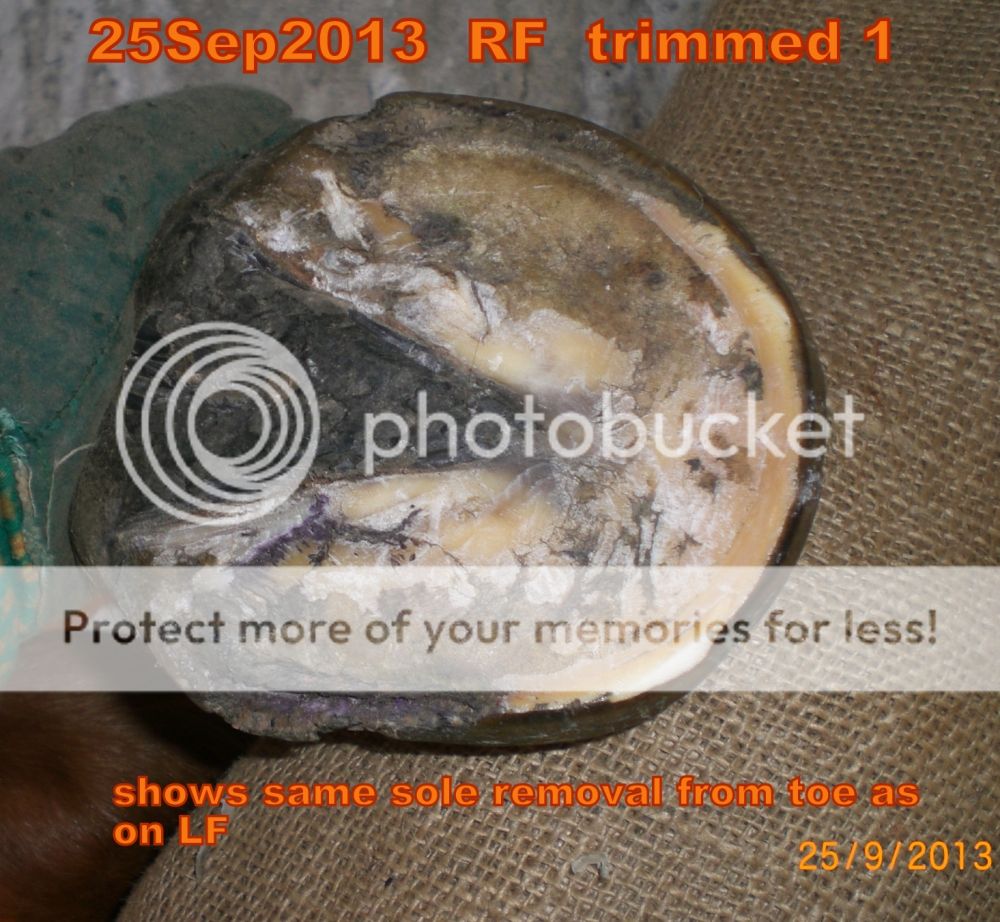
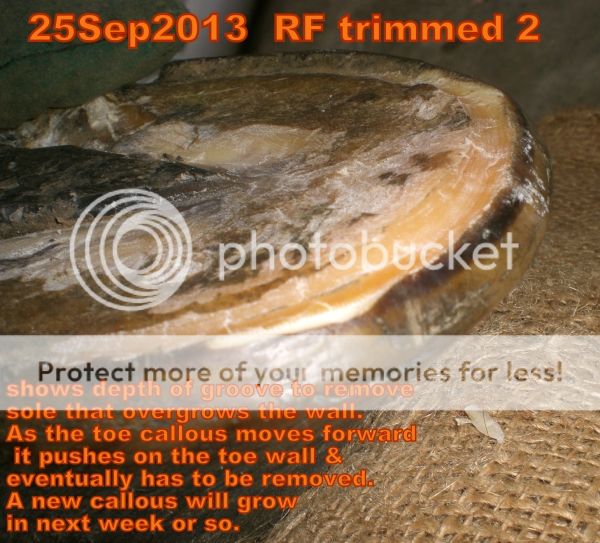
 Here are 2 photos from latest trim to show the tiny bit of wall height I have left this time to see if it can withstand the forward push or whether it will yield & bend forward (in which case it will have to be removed). So it’s just a trial. If it works I’ll see if I can leave a bit more next trim.
 
 
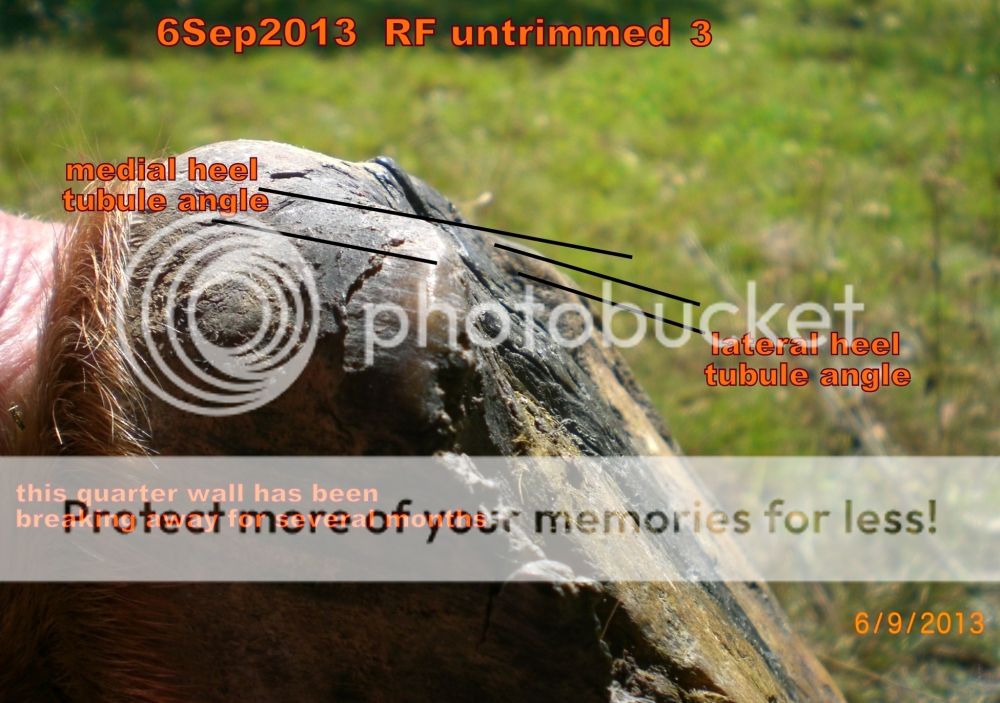
This next photo shows the slowly changing tubule angles as new grows comes down from the coronet band.
I’m really excited about this positive improvement.
 
 
Toe Groove
 
 
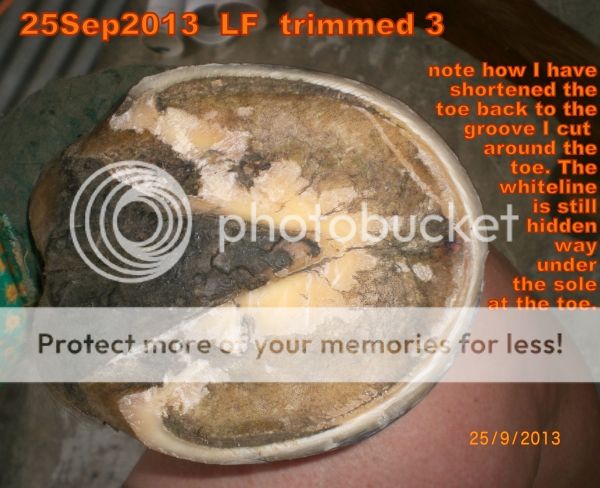
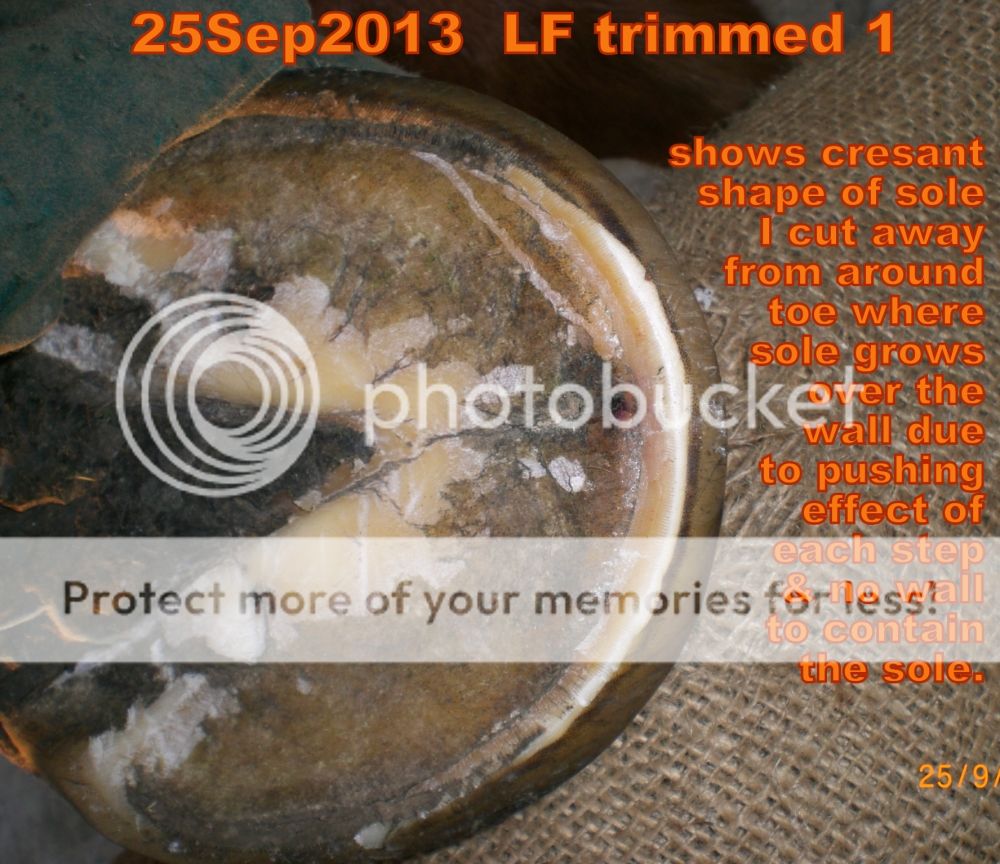
The other thing I want to show is how I make the groove around the toe that removes the sole that grows over the wall which is driven by forward push of sole at every step. People become confused by this excess sole & think it shows the whiteline so they don’t want to trim inside it. However it is only excess sole & the whiteline is way inside that place. This excess sole grows across the lower surface of the wall when the wall is trimmed back to the level of the sole in an attempt to stop leverage causing the toe to run forward.
Unfortunately there is only 1 way to get the long toe off & that is to take it right back to the proper breakover & keep it there until the dorsal wall grows down steeper. During that process the sole can escape from under the hoof because there is no longer any wall to contain it. Because the heels are also run under as part of the total process of the whole hoof running forward, it applies a lot of forward pressure to the sole & wall. This forward pressure pushes sole forward out from under the wall & covers the lower edge of the wall. So every 2nd trim I have to remove it. Slowly over time with diligence I have encouraged the dorsal wall to come under control & a new correct angle has grown down.
Now that the correct dorsal angle has been achieved I can begin leaving some wall height again to contain the sole. Only time will tell if it is the right time to start this next process or if it is premature.


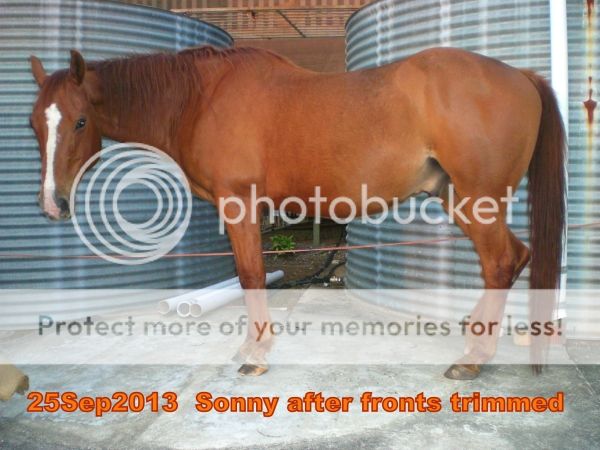
Sonny is still not standing properly but hopefully his feet are generally heading in the right direction. He’s still slumping in his forequarters which I take to mean there is still pain.
 
See all the latest photos in this album:-
I’m sorry to say the “organize” feature does not work in Photobucket anymore (it used to work really well before they changed the format & updated the software!) so now the photos no longer stay in the correct order. I hate that. It’s important to be able to see the pretrim shots in order then the progression through the trim & also to see all the right fronts & all the left fronts together in order, not scattered all over the place.  }:^/
 
 
.


Wednesday, September 11, 2013

Cool Feet!


What can I say? I'm ecstatic.

A week ago I noticed the heat disappearing from Sonny's fronts in particular & to a lesser extent in his hinds.

5days go I let them into a new paddock as per my usual paddock rotation, whereupon the 3 horses proceeded to gallop & cavort for a good 10mins. Sonny galloped the hardest I've seen in a long time.

My heart was in my mouth as every previous time he has cavorted, he ended up with really sore feet again & sometimes abscesses. But this time it was different because I already knew his feet were cool. So I allowed the exercise.

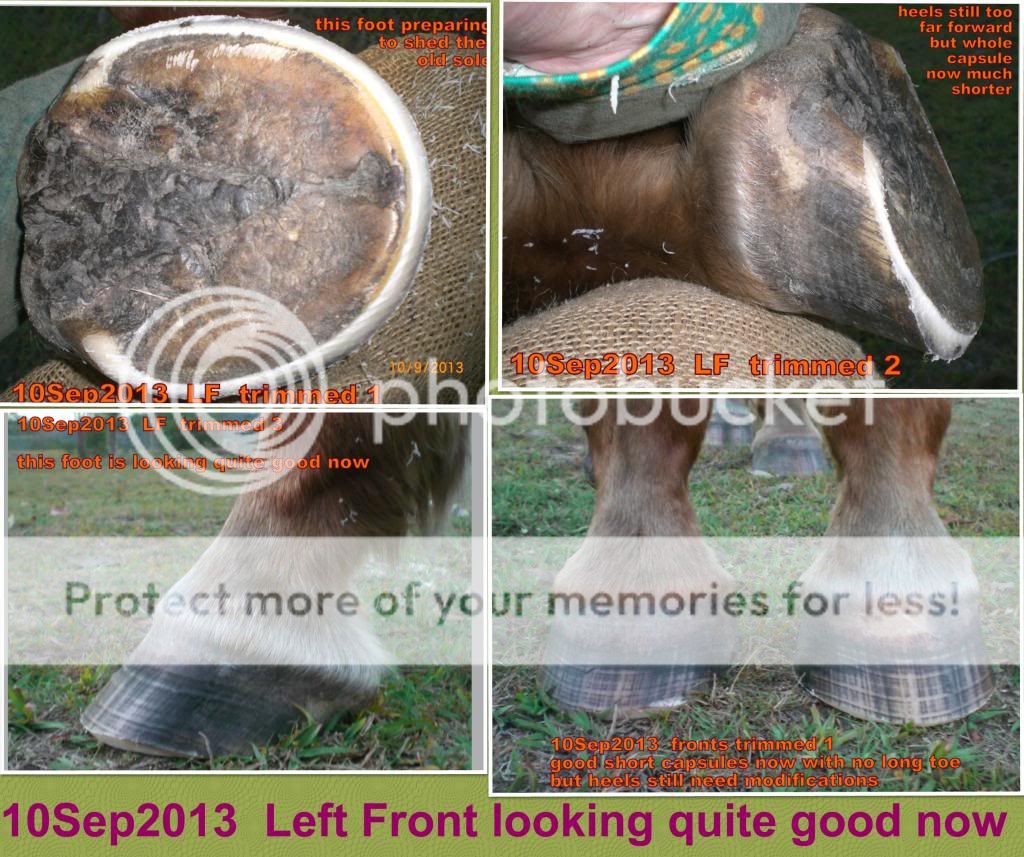
I waited 2days to see if his feet stayed cool & yes indeed they have done. So yesterday I trimmed him again. He is still sore when asked to turn a tight corner or otherwise use the sides of his feet.

The capsules are quite short now, the heels are still wanting to run under but I think it might take a little time for changes to be noticed there as  result of the toe being much shorter & dorsal wall more upright. Actually rather than the heels being run under they are just still too far under the foot.

I'm hoping to begin seeing heel changes in the next few weeks now that the toe shouldn't be dragging them forward anymore.

3 interesting things I noticed this last week:-

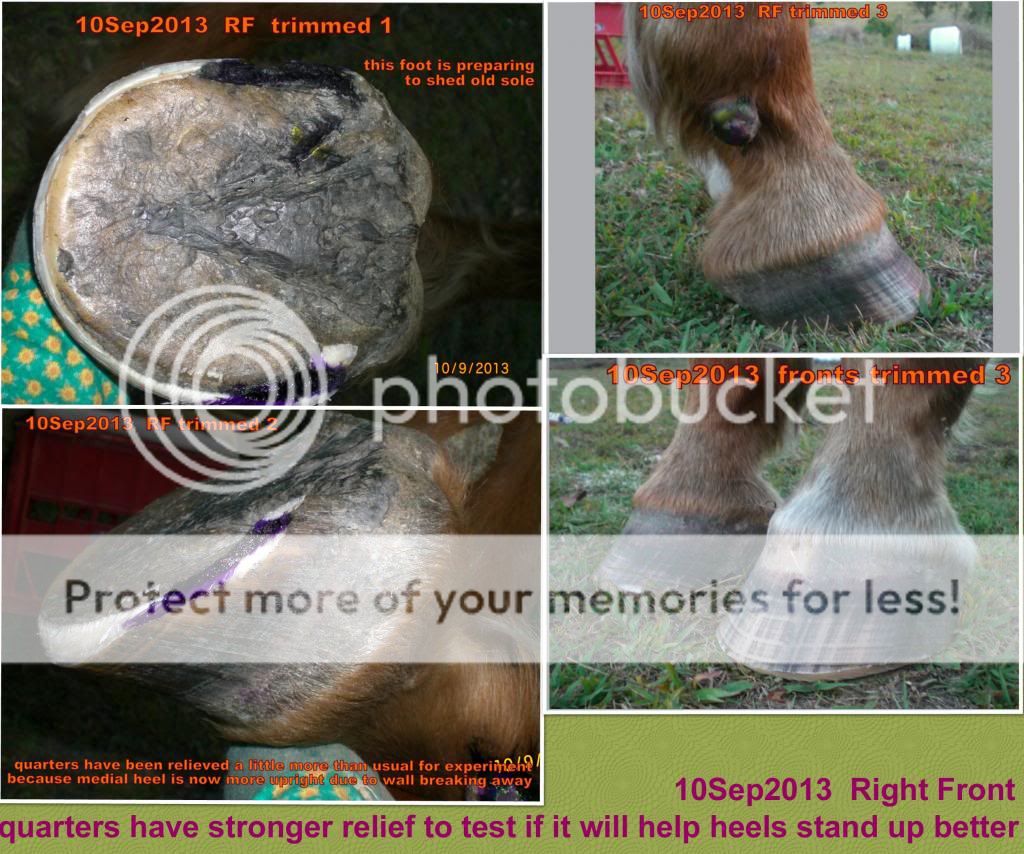
1. The RF medial quarter wall is very weak & breaks away easily which in effect disconnects the toe from the heel so the toe can't drag the heel forward. That medial heel is now growing at a straighter angle. So I am experimenting with applying a stronger relief to the lateral quarter to see if the same thing might happen to that heel.

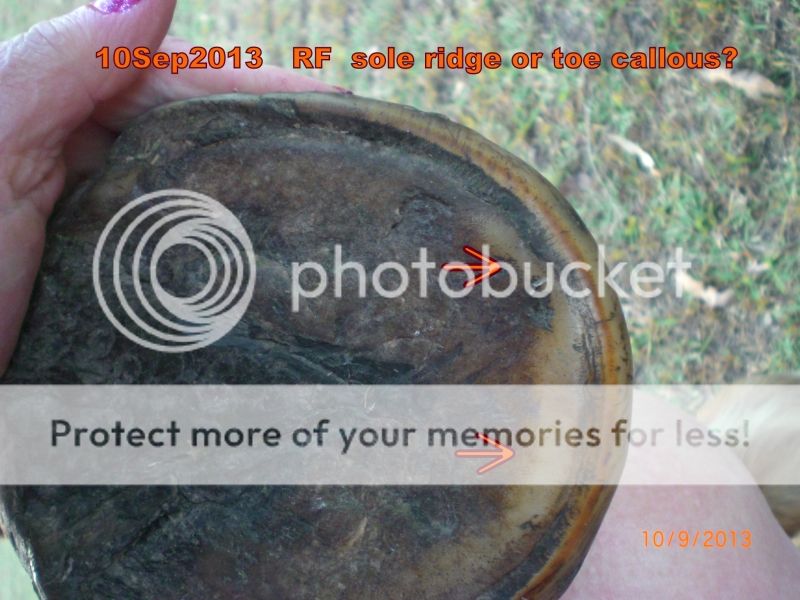
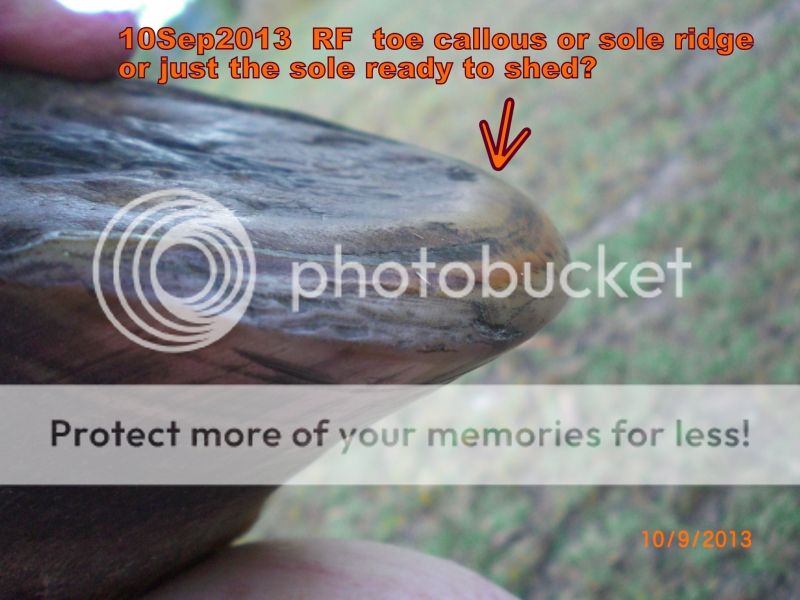
2. A sole callous or toe callous has developed right behind the toe wall. I am leaving it for now as best I can because it arrived right when I noticed the heat go from the feet & it is clear it is lifting the sole off the ground a little. So I am leaving a tiny bit more heel height to keep the angle of sole plane right. Otherwise the toe would end up jacked up with more sole under it & the heels still flat. That might cause a negative palmer angle. I've included a couple of photos of that callous.

If I see it begin to push the toe forward I'll rasp it off. Previously it has caused the toes to push forward but now with a steeper dorsal wall perhaps the callous will do it's correct job of lifting the sole off the ground instead.

3. A week ago I started my horses on a new mineral supplement & already I can see changes. I am wondering if these cool feet are part of that change. As per the vets instructions I am giving Sonny twice the dose for first 3wks then reducing it back to normal dose after 6wks.


Apart from that all my horses are in the throws of shedding old soles. With Sonny's thin soles I have not tried to remove the old sole. We will get rain eventually & the old sole will soften by itself. In the meantime it affords him extra sole thickness & protection.

Next trim I expect I can shorten the heels a tiny bit, particularly if I start seeing a growth change in their position in relation to the foot.


So here are the collages I made;-


All in all I'm very happy with progress. The thing that would make me even happier was if he stopped being sore on the sides of his feet as that would indicate to me that riding might be around the corner again.  Yippee!!


Here are the 2 photos showing the toe callous.


.

Saturday, September 7, 2013

A Little Breakthrough re the Heels


The photo says it all pretty much.


No amount of heel shortening or toe shortening has had any affect on the angle of the heel tubule growth so far.

Yesterday I was looking at his feet again & I noticed this differing tubule angle.

The difference must be due to the wall being broken away so it's not able to transfer the pull from the toe through to the heel.

The medial quarter wall is very poor quality due to compromised blood supply in the coronet band. Hopefully it will re-establish new blood supply soon.

Maybe I should heavily scoop all the quarters for a few weeks to see if there is a difference in heel growth. Now that he is on a new supplement to cause hoof growth it might not take too long for any change to be noticeable.

I think the whole old sole is getting ready to slough away too. It will be good if that happens cos it has gotten so hard I can't cut into it anymore with the knife. But this happened last year too.

The recent 6-7wks of dry weather has been great for aiding hoof healing & just so the horses aren't standing in wet grass all the time.

Monday, July 22, 2013

Comparison Photos


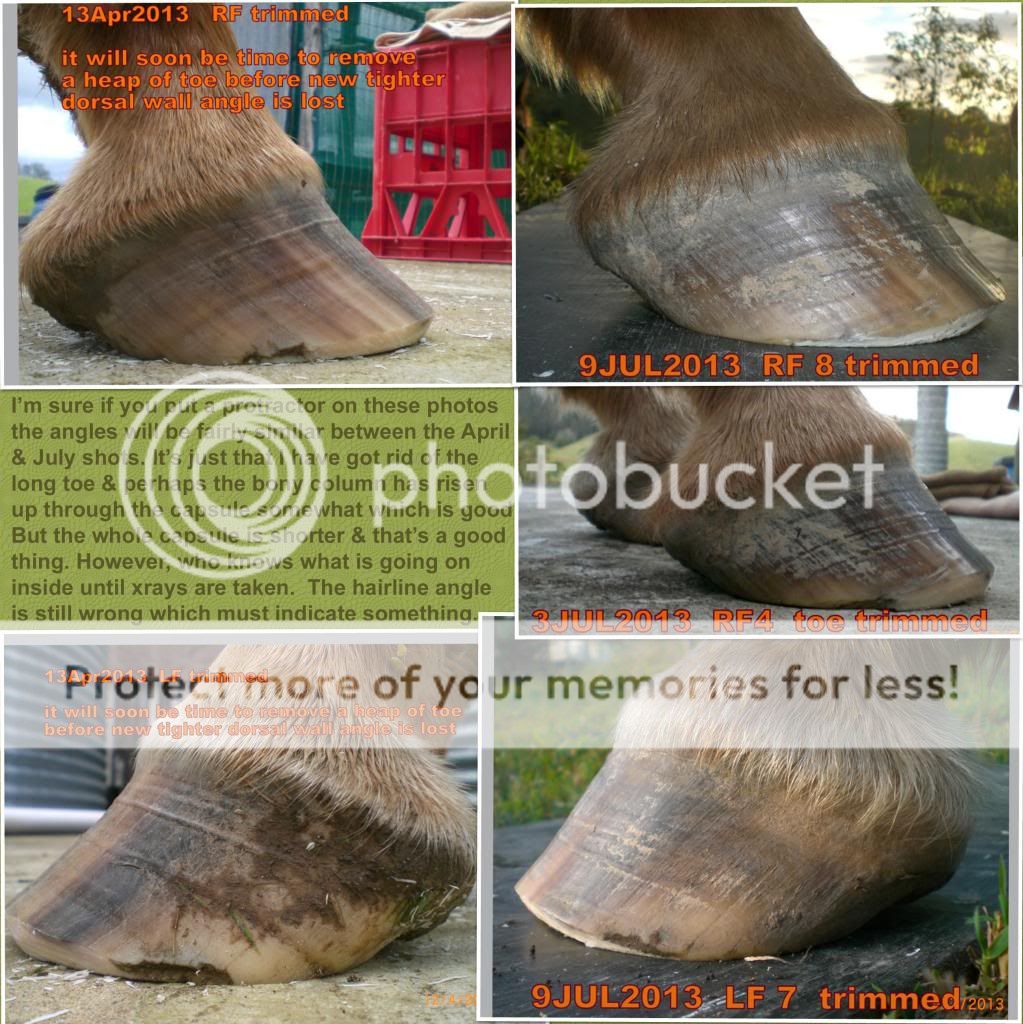
This is a set of interesting photos for comparison showing how I have finally been able to reduce the length of Sonny’s toe. Previously I didn’t feel that there was enough integral strength in the capsule to remove so much toe. He was always sore or there were still imperfections in the ground bearing surface of the wall like at the quarters.

However over the last couple of weeks it has all come together mostly due to me leaving more heel. I think because the sole at the seats of corn & his frogs are also so thin from the very wet conditions, he is feeling the ground too much & damaging his internal structures in that region. So leaving some height gets that area off the ground somewhat & *may* even induce some extra thickness to develop. That would be nice! In anycase he is far less sore with an extra 1/4inch of heel height that if I take the heel right down t the point where the periople flap crosses the heel horn.

Yesterday I had to move the horses to the front paddock due to too much rain & the back paddock getting far too wet, therefore causing even more damage to their feet. Jude went down all of a sudden & I discovered her legs were swollen & the wet had eaten right through her frogs & seats of corns too. I guess it had been happening for a while but it never looked that bad. I had to give her bute.

Once they realized I was opening the gate to the front paddock they came galloping, bucking, farting, flagging & trumpeting to me & continued for ages. Even Sonny was putting on a good turn so that was proof that my decision to give him more height at the heels was the right one.

The one issue that I haven’t been able to resolve to date is the angle of the heels which is too shallow. Taking them down to sole height hasn’t fixed it, just removed the underrun heel. Some say the heel angle won’t fix itself until the toe is short enough. So now that I have got the toe right, I might see an improvement in the heel angle.

That would be nice too!

One thing I am a bit concerned about is that he may now have a permanent integrity problem with the lamina connections of the lower dorsal walls. So even if I can keep the toes this short, it may not be enough sometimes, thereby allowing angles to run wild again at the drop of a hat. Time will tell no doubt.
If you click on this photo it will be shown really big.


Thursday, July 11, 2013

Long Toe GONE!


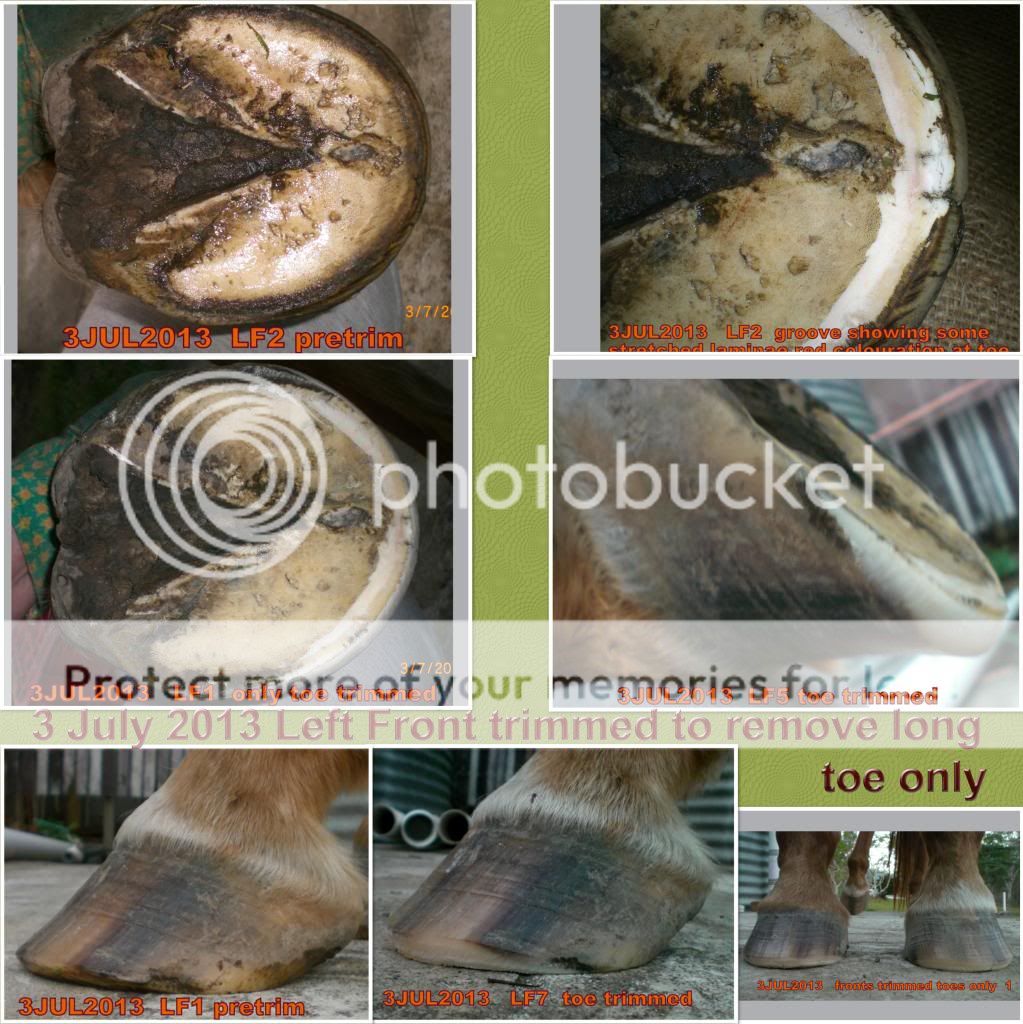
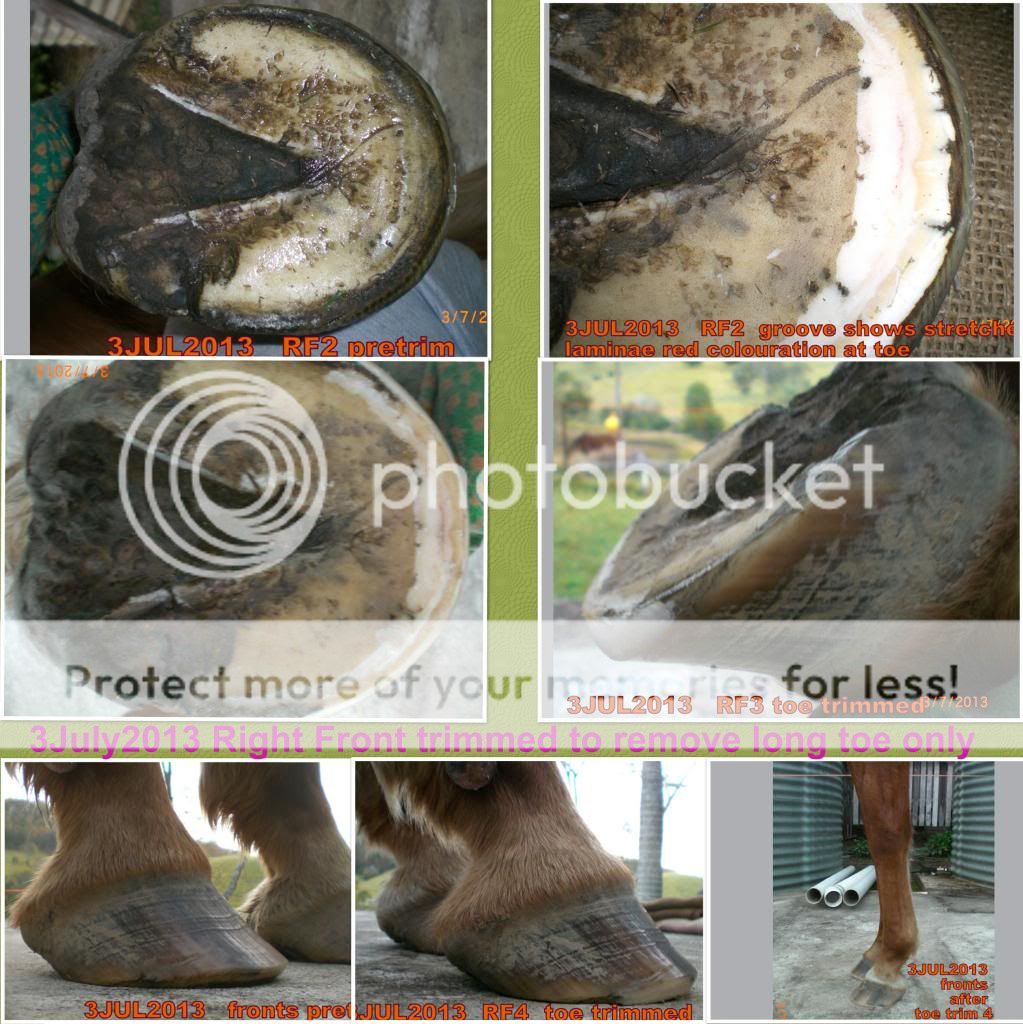
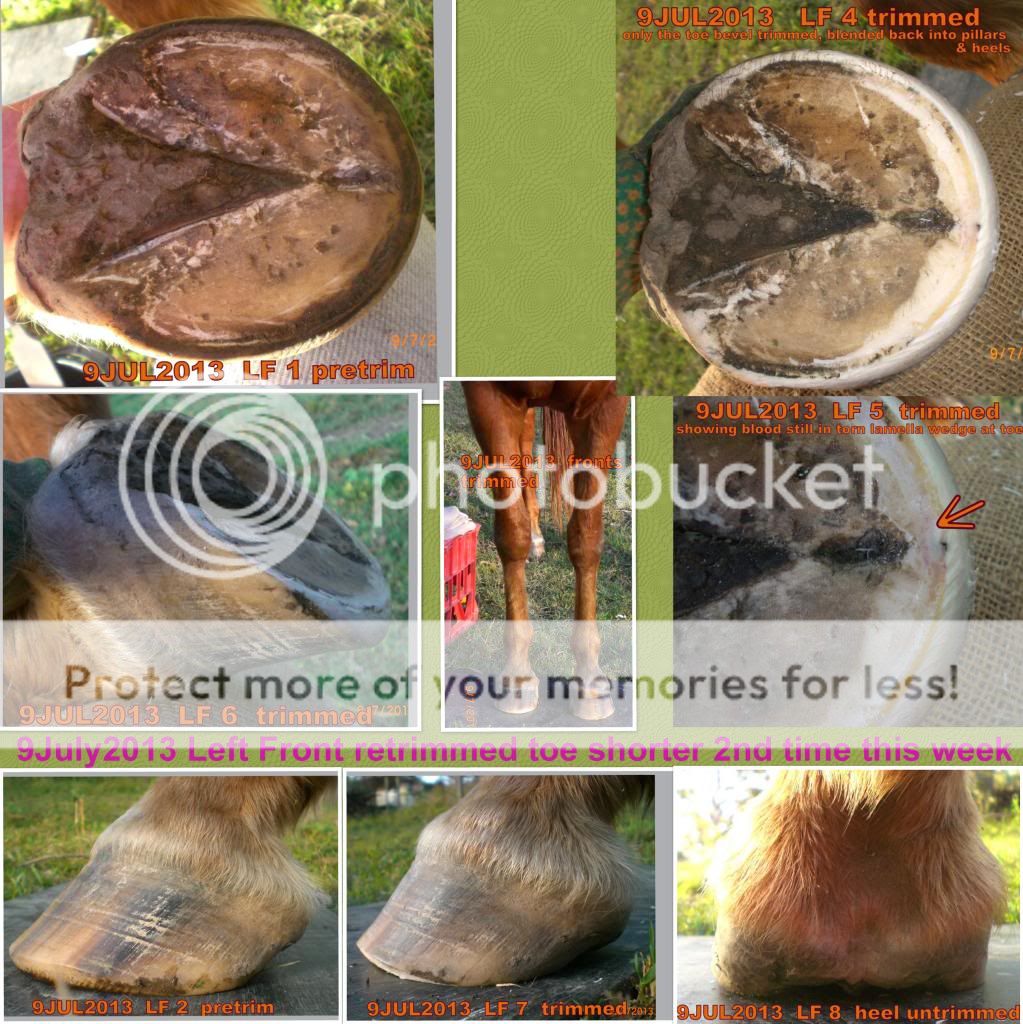
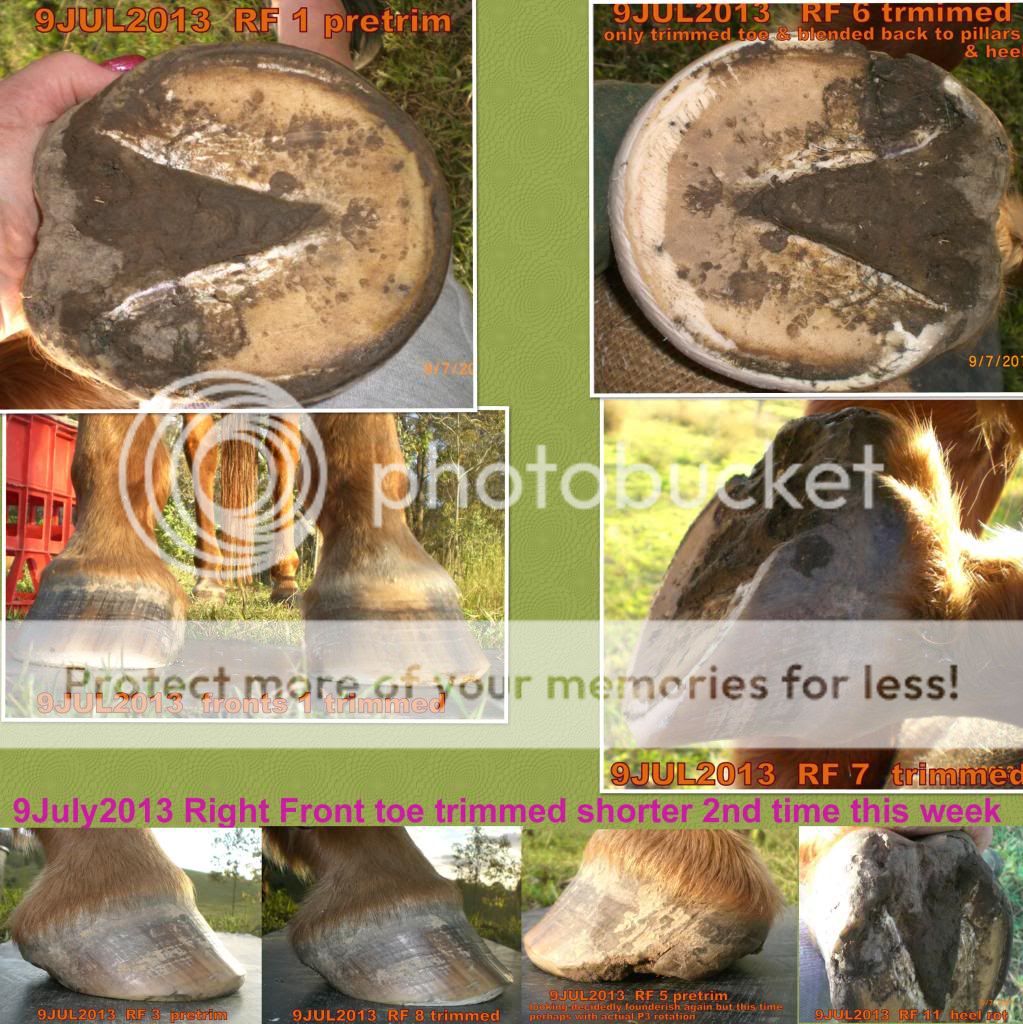
Since my last post I have been able to do Sonny’s feet twice & remove most of the long toe. I did it over 2 days, 3rd & 9th of July. His feet were not hot before each trim & didn’t get hot after each trim. I was really chuffed.

I have been experimenting again with leaving the heel a tiny tad longer & that seems to be the thing that prevents his feet getting hot or inflamed or laminitic. Of course I am very carefully monitoring this as even a slightly longer heel can cause the toe to run forward.

I’m trying to keep the toe well bevelled or rockered to remove any leverage that might affect a slightly longer heel until any probability of heat is past. Sonny needs exercise & if his feet are hot he won’t walk around.

The LF is pretty much the right shape now I think. I will leave it at that for the time being until I know the internals are happy. The RF is not so far advanced. When I was editing the photos after the most recent trim I was very surprised to see that the dorsal wall of this RF appeared to be slightly broken forward. I will keep a very close eye on that. I might be that I just rasped to a point on the wall where the new tighter angle began. Or it could be that there is more going on.

The RF also has a deteriorated medial heel platform area where there was a problem in the coronet band late last year & early this year. Several abscesses broke out through the same point damaging the blood supply to the horn growth points in the coronet. The wall horn that grew has been very poor & the platform horn has also been similarly affected. With this never ending wet weather again, the heel platform are has just rotted away despite my regular application of Thrushbuster. I think the horn quality is so poor that just normal wear & tear would be enough to wear it away. It was so thin that I inadvertently put the hoof pick through the horn making Sonny jump big time! Poor guy.

I am thinking of casting that foot & using some tape to build up to the height of the normal heel platform height in that area. However I am concerned that applying a bit of material that will go hard might press on the sensitive live sole & cause too much pain for him to walk on it. So that would defeat the purpose of the cast. Previously I didn’t want to cast his feet due to the frequency of trimming. Leaving long toes & heels just would have contradicted & voided all attempts to restore his feet. Perhaps I can find a piece of firm foam rubber that might be better for that heel build up. It would have some give to it.

Anyway here are a few comparison photos in the form of 2 sets of collages with a comprehensive list of photos taken at each stage of both trims to be found that the following links.
These collages have been made with full sized photos so they will blow up much bigger if you want to see the photos in more detail. I think you just click on them.
3July2013 Left Front trim collage:-
 
3July2013 Right Front trim Collage:-


9July2013 Left Front Trim Collage:-


9July2013 Right Front Trim Collage:-


You can see in the photos at the bottom of this above collage of the RF trimmed that it does have an almost broken forward look to it like the P3 might be rotating to point downward, rather than what originally happened where the capsule rotated round the bony column. I am saving for new xrays & hopefully they can be done in about 4wks time. This is the heel I am thinking of casting to help it grow back to get over the loss of the platform.


All in all I'm pretty impressed with recent improvements. Now to see if the internals have also healed so I can ride again! Hopefully the vet & the xray can tell me that.


Thursday, June 27, 2013

All is revealed!


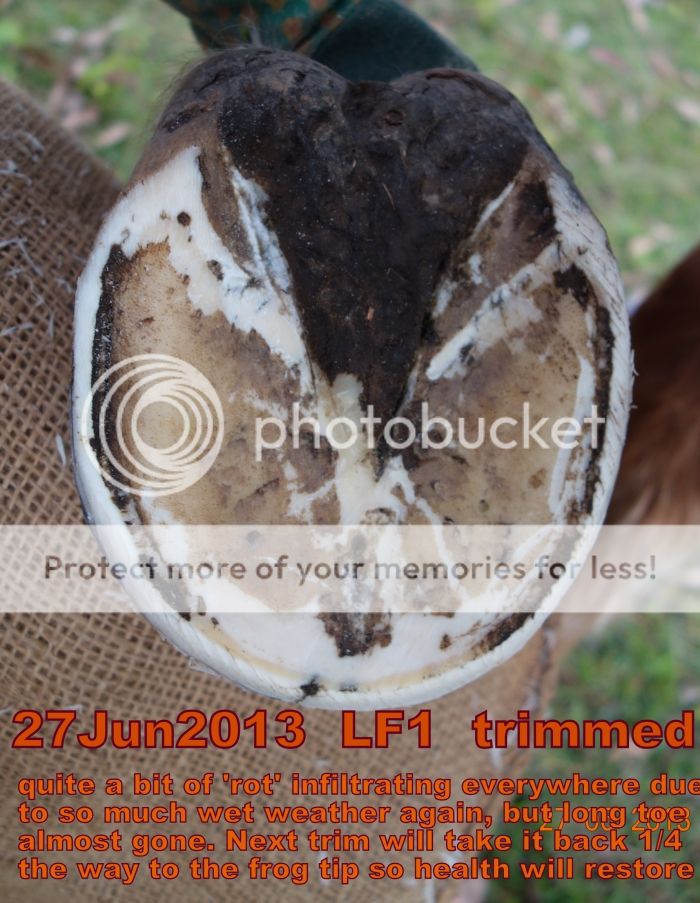
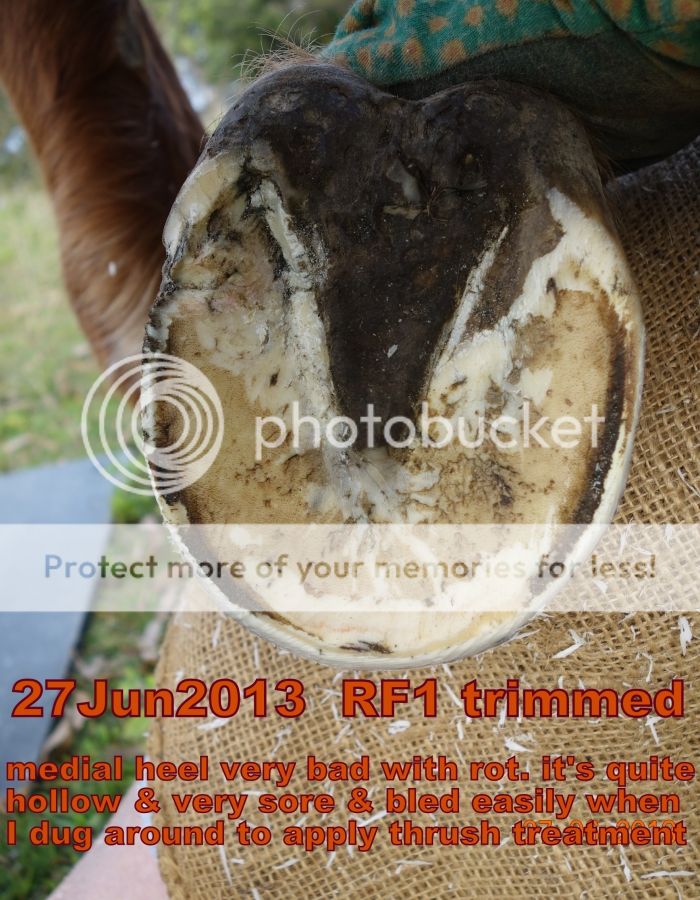
Today’s normal weekly trim has revealed the cause of Sonny’s soreness. I think all feet are affected by some sort of ‘rot’. It doesn’t smell & isn’t slimy or powdery. It’s just the horn collapsing much like the last 2 years when the problem was thought to be caused by pure bad mechanics of the trim on my part applying incorrect pressures in many parts of the hooves.
Supposedly I have the trim mechanics under control now so why is it happening again? Once the horn tubules begin to deteriorate, moisture gets into the microscopic crevices & the ‘rot’ sets in.

I know the heels are still a bit high & forward but I am taking them down each trim as much as his feet can tolerate since he gets so sore after each trim. Often I will do the heels one day & a few days later I will do the toe & make sure it is all level right through. Today I counted the number of rasp swipes on each heel & repeated that number across the toe because there is a little concavity now & since the frogs were so thin I felt he shouldn't get sore from squished frogs from lowering the heels. There wasn't very much build up of height of the toe callous this time which was good. Soon there shouldn't be any toe callous building up by getting pushed forward of the coffin bone.

The next trim should involve rockering the toe again. I cycle around 3 versions of the trim as there is so much to fix. Rockering the toe removes the leverage applied by the long toe & brings the breakover back to where it should be. But by rasping away the retaining wall across the toe, it allows the sole to push forward from under the foot (cos the tubules are laying flat facing forward instead of standing up perpendicular to create a nice thick sole)& cover the bottom of the wall. That then means making the groove around the toe just behind the wall to stop the sole pushing the toe wall forward at ground level. So that is the next version of the trim & includes bevelling the toe wall to keep leverage to a minimum. The final part of the cycle is removing the excess toe wall that was revealed & grew during the week or so after cutting the sole back from the inner wall. Then each trim is divided into 2 parts, heel day & toe day a few days later to avoid soreness.

There has been a big improvement but of course much more to go yet, not to mention the recovery of internal parts which seems to be slower than I thought it might be.

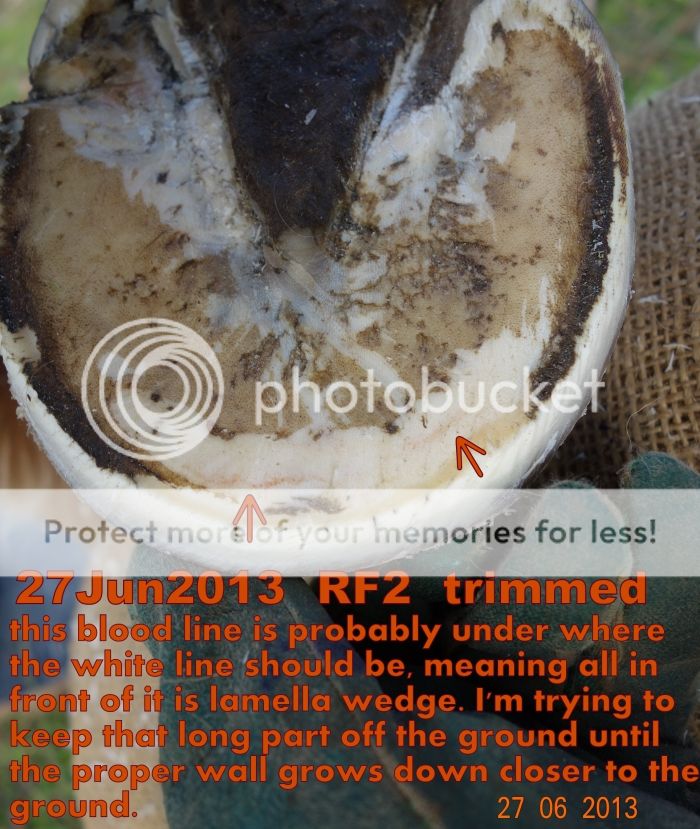
So here are some photos taken today after the trim. The LF seemed to be the best of his feet this time. The RF has the bad rot in the heel where I had to remove the whole heel as his weight was causing it to cave in under the hoof. The bar is eaten away & there it is hollow under the seat of corn. So I cut all of that heel away around to the quarter which had a crack going right up to the coronet band that had only appeared in the last couple of days.


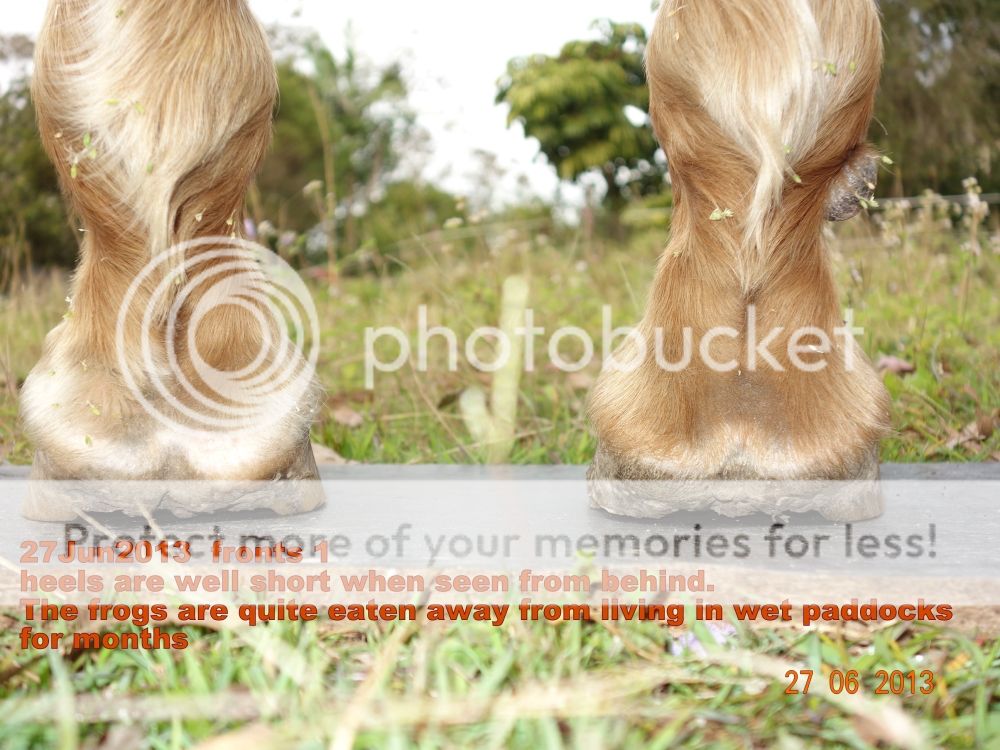
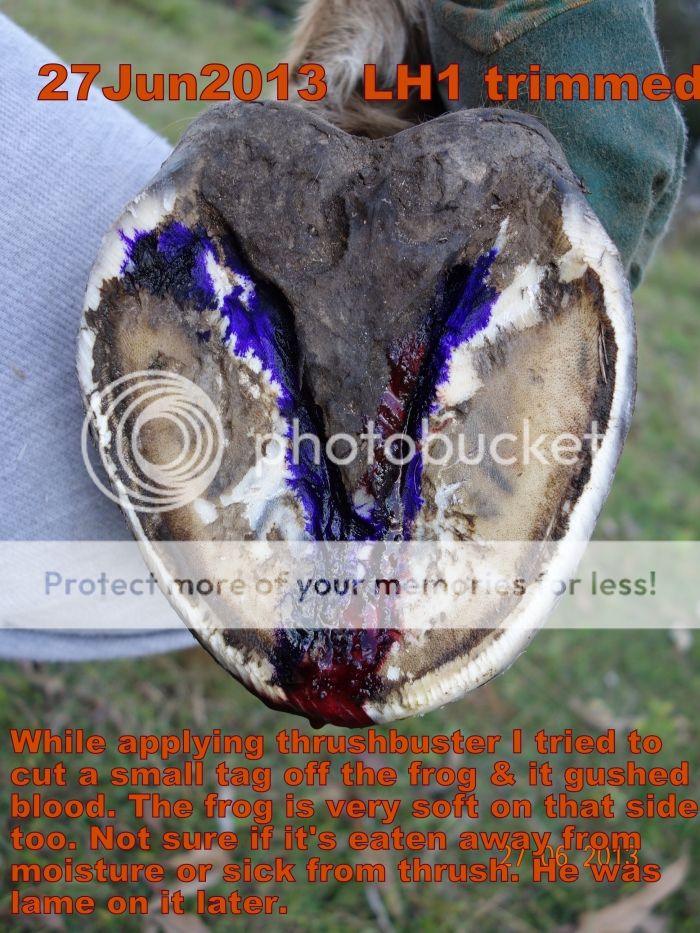
The frog on this back foot just spurted blood when I tried to take a thin sliver of the side of the frog to remove a little tag of skin. The frog is really mushy although not hot. He is sore on that foot when walking. I can’t work out whether the frogs are eaten away from the continuous wet paddocks or what. There certainly isn’t any thrush in them cos there’s no smell or powdery stuff or moist slimy patches, etc. But it is normal for the frogs on all my horses to get like this all through the wet season & in a wet winter. Then in spring when the weather gets drier they fill out again. This winter is shaping up to be wet with a heap of rain coming tomorrow & staying for the next week. Just what the horse’s feet need. I do use Thrushbuster regularly on their feet but the problem is not always some sort of thrush.

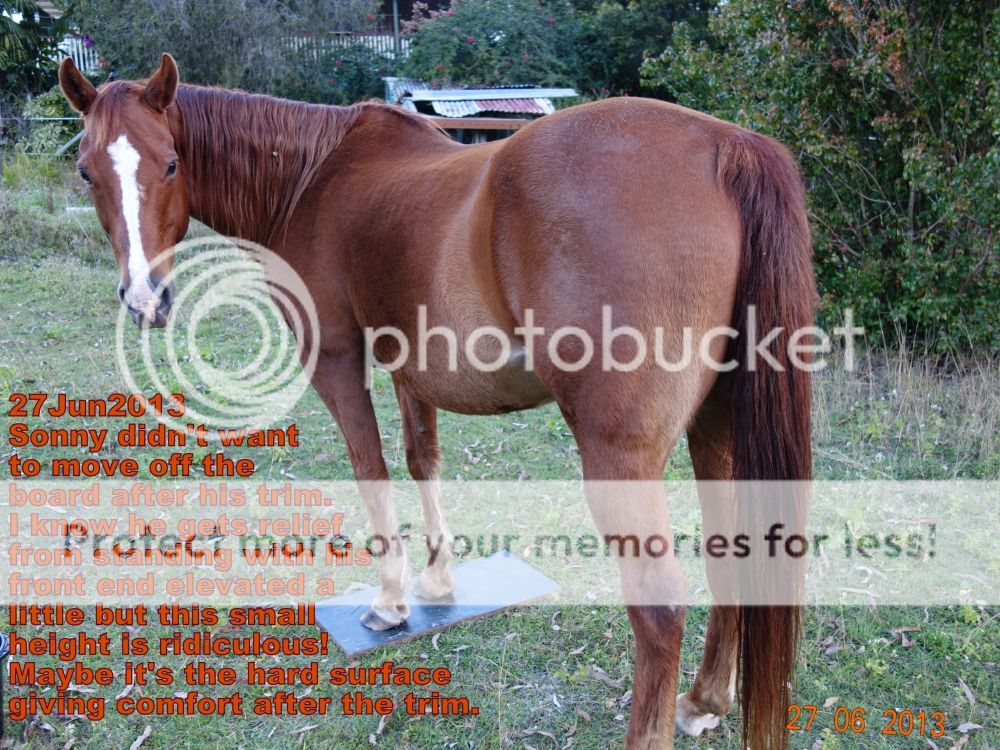
After trimming Sonny I stood him on the board to take some of the photos, then told him he was finished & could get off & go about his grazing. But he wanted to stay there as can be seen by the look on his face in this shot. He stayed there for about 10mins til the other horses moved away!


As usual the other photos can be found at the link here:-  http://s340.photobucket.com/user/claireT_2008/library/2013%20%20all%20photos/2013%20June%20Sonnys%20Feet

I took medial & lateral profile shots of both fronts along with heel shots.


Tuesday, June 25, 2013

I shouldn't speak so soon!

I just love good news like anyone else but today it is not so good.

It was my plan to remove the last of the long toe today as a new angle with hardly any lamella wedge has almost grown right down, the best I have achieved ever, really. But Sonny's fronts are so sore he can not walk on any hard or stoney ground today. I noticed him a bit sore several days ago & pinpointed a soreness inside the quarter wall of the medial heel of right front (the worst hoof). It was a bit hot but the coronet was not sore.

I have given it time to see if it was an abscess but that doesn't seem to be the case. Now he just won't walk on any sort of hard ground. I did sit on his back 2 days ago & walk around for about a minute. I am thinking that is why his whole front feet are sore now.

So I don't want to lower his toes now due to the tenderness. I know that when I lower either the heels or the toes or both more than a small tad he does get sore for a day or 2. Therefore I only do one or the other & leave a few days inbetween for him to recover.

But if his feet are already sore & I rasp off that last bit of long toe it will make him even worse & might trigger an abscess cycle. The toe is well rockered & there are wear signs right over the whole rockered edge so it is working. I will just have to be patient & wait a few more days or a week.

This soreness bothers me somewhat in so much as if it was triggered by my weight for just a minute on soft ground it could mean the sole corium hasn't regrown since last year's abscess cycle. That would be very bad news this length of time since the founder. Luckily the paddocks are still quite soft & cold due to recent rain & the cold weather, therefore helping to reduce any inflammation building up in the soles & hooves in general.

Friday, May 17, 2013

Looking more like Fixed everyday now!


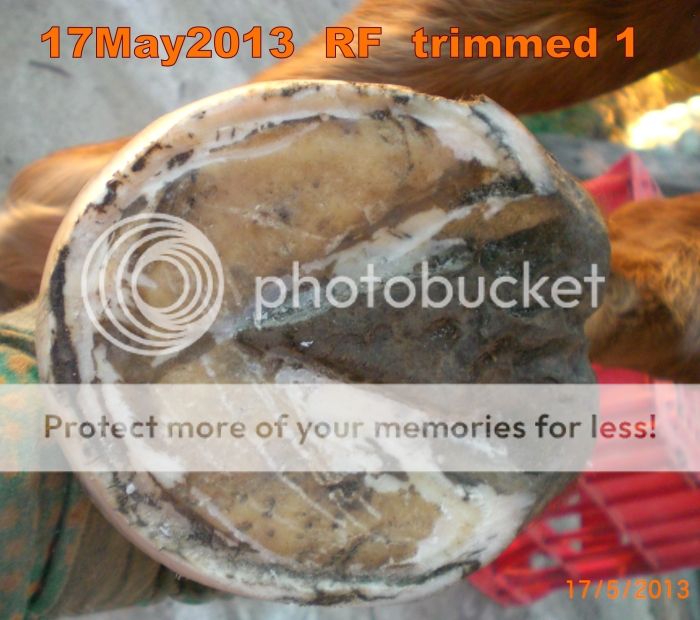
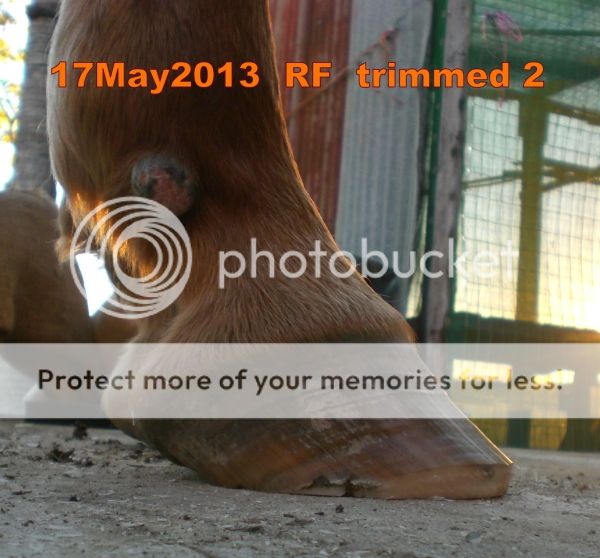
Since I last posted I have been doing mini trims, just one thing each time. About 2wks after last full trim I redid the toe bevel, then a week ago I made the groove around the toe behind the wall. Now today a full trim again. That seems to be a way of not getting him sore after a trim. With winter coming on his feet have slowed down growth somewhat. Which is ok.

With the toe coming back nicely it is now time to begin allowing the wall to grow down beyond the sole a tad. That is what will help concavity develop as sole builds up behind the wall. When the tubules are growing straight down again perpendicular to the ground as they are starting to do now, the sole backs up behind the wall & thickens creating a raised zone. That lifts the whole foot off the ground a little allowing the scooped out shape of the sole to develop.

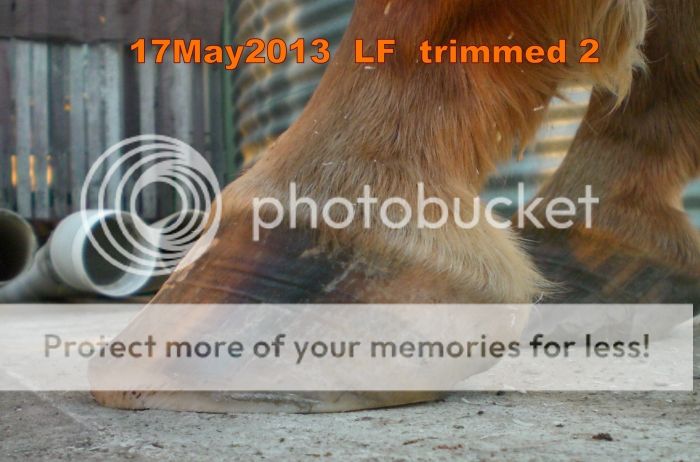
So this is where we are at. The heels could be better but that will flow in once the new steeper toe angle has grown right down. Here below is a pair of comparison shots showing just how much better the toe angle is now. You can see how the new angle is growing down much steeper. The frog tip has receded back my about 1cm so far. I could have taken more off the toe today but I have previously found that taking too much off at one time does make him sore. I can take more off the toe length next week.


The old compromised wall on the Right Front is growing out now too. See in todays photo  (above) the medial side of the Right Front behind the left front where the old horn is breaking away, there is quite solid horn growing down above it. That was one place where the abscesses kept breaking out at the same place & finally damaged the coronet band.


In this photo it looks like the frog is eaten away but its just an illusion. The ground is quite wet from rain again so the colours are a bit off. The frog is quite thick & the walls have grown down beyond the sole about 3ml. The sole still is trying to grow over the wall so I am still making the groove around to break the connection. But each trim it gets just a little bit better.


Now in the trimmed photo it's easier to see the frog is right. Also it is receding (getting shorter or less stretched from the heel) So the dorsal wall can be taken back quite a bit over the next week or so. There is still quite a bit to remove. But the horn quality is really good as can be seen by the way the light is coming through the wall on the medial quarter. After these photos were taken I did a bit more digging around & applied some Thrushbuster in various places.


The Right Front is looking really good now with
a nice round shape developing. Both fronts are pretty much even now with just small things to adjust each trim.


This foot is looking so much better now with just these bits of compromised wall on each side. Such an improvement to what it was like not that long ago.


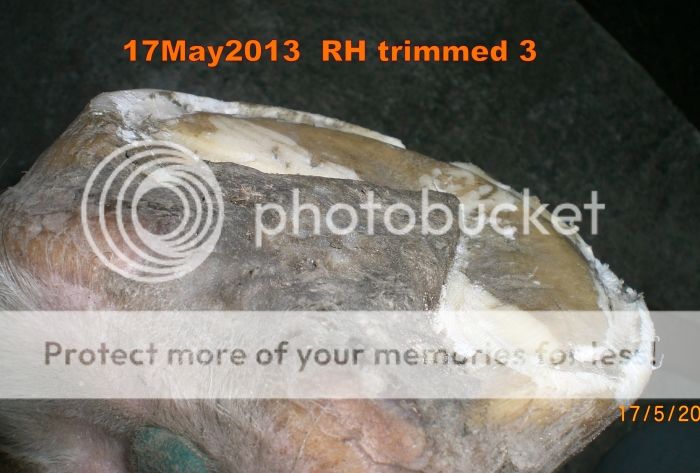
Some great shots of his back feet this week which are coming along very well now. I wanted to include this one in the post because it clearly shows the sole bunching up behind the wall of the toe in the very early stages of developing more concavity. This is not to be confused with toe callous or toe ridge or whatever else it might be called which really does look a lot different in the flesh.


More photos from todays trim are to be found at this link to my online album.

http://s340.photobucket.com/user/claireT_2008/library/2013%20%20all%20photos/2013%20May%20Sonnys%20Feet

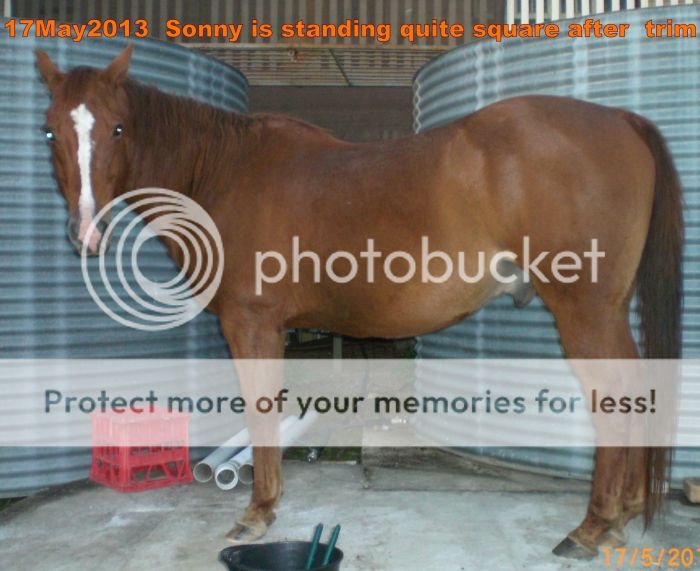
here is a very interesting shot of Sonny after the trim where he is standing quite straight & square but note how downhill he is like his shoulder has collapsed........  I'll have to get back onto those chest lifting exercises I think.


So all in all things are very positive. Sonny is bounding around & when it was feed time after todays trim he launched himself down the slippery slope of the back paddock at speed, then dug his back feet in for breaks like he hasn't done for a long time.

Soon be time to think about a test ride again. woohoo!

It's all good!!! :)  :)  :)


.

Wednesday, April 17, 2013

Quick & decisive action for the Toe


Re the comment in previous post about needing to take decisive action to stop the new angle from being lost on the toe.

 I have last night had consultation with Linda Harris who did a mark-up for me & in the dark I made significant changes to the shape of Sonny’s front feet with yet more to come tomorrow.

I removed the ridges (toe callouses) totally that I wrote about on some of the photos (follow the link to my album in previous post). Linda said as they get stronger they push on the toe wall forcing it outwards thereby creating lamella wedge behind the outer wall. That is why I have previously lost the new tighter angle at this point. I did notice that the ridge (toe callous) always started to grow at this point but never knew why & still don’t.  But what’s important is that it had to come off asap.

Then following her mark-up I made a shallow rocker from a certain point forward of the frog tip to the front of the toe. Then from the top I removed a good 10ml of toe length. Went back underneath & rounded the ends at the pillars. I sent photos & Linda reminded me that the pillars were now longer than the toe which is wrong as it creates a square toe which results in the pillars jamming up the coronet band above them.
   
 
So tonight after the rain has stopped yet again, I will quickly measure the dorsal wall & make the pillars the same length. This time I will use aeroguard on both of us as last night the mozzies nearly carried us away!!
In the #3 photo it does look like the wall is the same length all the way round but in the #4 photo it looks like the pillars are longer giving the squared off look. Maybe it's just the camera lens playing tricks which it is prone to doing at such close range by giving a slight fish eye type effect. But you can see how the longer pillars are pushing up into the coronet band in the #4 photo making the coronet band wavy. If the pillars are indeed longer the shape will be quite evident now after 24hrs.

This new trim shape will have to be maintained for some weeks until the new angle has reached the ground whereupon he should have a new tighter connection all the way down the dorsal wall with little lamella wedge in there, so a steeper front wall. That will flow on to the heels as well.

My next job then is to straighten the Left Front where you can see the tubules are twisting outward a lot more than they usually do. During all this toe work I have forgotten to always make the correction for his turned out foot.

There’s always something to do with a horses foot!

Monday, April 15, 2013

Rapid Improvements Showing Now!


It's a year since the RF photo in the right hand column of his blog was taken. What great changes have taken place since then!

Wet Weather
It has been so wet for 2months continuously & this fact shows clearly in the soles of all my horses. Sonny has pits & erosions galore but I know from previous experience they will fill in once the ground dries up a bit. The frogs will fill out again too within days.

Weekly Trims are order of the day
I have been trimming at least weekly when weather permits but have not been uploading all photos. There are great improvements now. One week I will redo the toe bevel making it stronger, then the next week I will do the heels & redress the toe bevel a little (as I have done for these photos). I have found this method best to prevent soreness which can happen when having to take a strong bevel or toe rocker between the pillars to remove leverage off the toe wall as the new tighter angle grows down.


Heel height reducing
The periople & general heel bulb height is shrinking now that the heel tubules are standing straight up rather than laying down & running under & forward. That in itself is a major step forward. The hairline will soon be at the right angle again. Cleaning out all the ingrown bar material that was jamming up the back of P3 is what has enabled the back of the hoof to settle back into a normal shape again.
Plus a tighter new angle is growing down the toe which will soon need a lot more help to keep on track. It will need a much stronger rocker along with removing a fair bit of the toe wall at ground level. I have been at this point several times before & obviously not taken a strong enough action because I have lost the new tight angle every time. That has allowed the toe to run forward even more each time.
 

A Matched Pair
It is gratifying to see that both fronts now look like a matched pair again after 2 or so years.


Exercises!
Sonny is happy to fling himself around at speed in the very wet conditions. He digs his toes in & levers himself off them for full-on cavorting of twisting, bucking, rearing & cutting moves, although I haven’t seen him galloping recently. So his toes must not be sore anymore at least.

Here are is the link to the rest of todays photos in my Photobucket album here:-  http://s340.photobucket.com/user/claireT_2008/library/2013%20%20all%20photos/2013%20April%20Sonnys%20Feet

Thursday, March 7, 2013

Linda Harris


Recently several people have asked me who I had learned from regarding the amazing repair of Sonny’s feet. I have previously put this link in a blog post plus it is on my Links Page, but I’m happy to add it again & again because this lady really does exceptional work regarding the research, understanding, exploration & detailed examination of the equine foot.

Linda Harris is from USA & has been exploring the anatomy of the equine hoof for several years. She has many 10’s of very informative videos on youtube plus a yahoo group where people can ask questions, post photos & get Linda’s help to re-establish hoof health to their equine friends.

Linda has developed a hoof mapping method to establish the position of the internal foot so that the correct shape of the outer capsule can be regrown around the inner foot. It is called the ACT method (The Anatomically Correct Trim) & is based on Gene Ovnicek’s hoof mapping method.
 
Linda has worked out that the majority of horses have run forward toes & heels which have to be fixed & because the outer capsule is only a covering for the true internal foot. It is that which must be accurately mapped so the external capsule can be regrown to have the tightest connection between laminae & hoof wall with a shape complimentary to that inner foot. Following her method will enable a person to correct a distorted hoof & then to maintain that new healthy hoof.

Along the way Linda is out to debunk all the myths, innuendo, misinformation & downright lies taught & perpetrated about the hoof to save countless horses from a life of painful misery & to save the lives of as many horses as possible that would otherwise be destroyed in one way or another due to the misunderstandings of the roll & interconnectedness the internal & external feet play in the body part called the equine hoof.

http://www.youtube.com/watch?v=-jOp00rF97M   this is one video where you can see how Linda dissects the hoof cadaver, gives all the names of the parts & shows from the inside how the hoof moves & gives one reason why a horse's gait might be choppy.
 
http://www.youtube.com/watch?v=EFbj07VtzEI&NR=1&feature=endscreen  This video gets you started on trimming.

http://pets.groups.yahoo.com/group/thehappyhoof/  this is the group message board.


Monday, February 25, 2013

We Went for a Short Ride Last Week!


About 10days ago I rode Sonny for a short ride out along the old highway!  :-)
I put his Easyboot Trails on his front feet with the new inner pads I made which I posted photos of a couple of posts back. The pads wore well. Sonny went well too. I just let him go at his own pace which was an average speed walk with a little shuffle trot now & then.  We only went about 1.5k in total & took about 30mins but I think it was a good test of his feet.

There hasn’t been much cavorting in the paddock recently because of rain to see if he is lame at all. But yesterday he ran through a gate & took off down the paddock when separated from Jude & he was limping a tiny bit as he made the sharp turn but I didn’t get to see it long enough to determine which leg it was.

Supplements 
Apart from that I have changed the supplement back to Jenny’s Provide It. I saved some from the last order because I had noticed that once their feet naturally wanted to stop growing for winter, the Dr Kohnke’s supplement would get them growing again, whereas Jenny’s didn’t. So I got some DK’s Cell Provide & changed all my horses onto that after their feet stopped growing for winter. They soon all started growing again which is why I have been able to keep trimming every 2-3wks. Usually there is nothing to trim for about 6wks at a time. So once the wet season arrived again I changed them back to Jenny’s Provide It to compare horn quality & growth speed. It will be interesting to see how their feet grow over the next several weeks.
 
 
3wks since last full trim. 
I was shocked to see it has been 3wks since I last did a full trim. I think I got out of sync because I have been redoing the toe bevel a lot more, almost every second day some weeks. It sure makes a huge difference to the new growth angle when the bevel is kept perfect.

Stronger toe bevel.
This trim I have made the toe bevel a little stronger just to see what happens. Previously if I did that & removed any of the inner wall, the sole would grow out from under the wall due to forward pushing pressure from the underrun heels. I’m aiming at starting the mapping method again which involves doing a rocker under the toe from just infront of the tip of P3. That removes more than just a tiny bit of inner wall under the toe. It takes a bit of sole too, so this week’s stronger toe bevel is the first step down that path. Previously when I tried the mapping with rocker, it made Sonny sore, just as it has done 3yrs ago when I first tried it. Back then I thought I must have done too strong of a rocker. But when I did it late last year he went sore too & it may still have been too much. It all points to the sole still being too thin even though it’s clear to see from last trim photos that his bony column is rising up through the capsule somewhat.

This mapping with toe rocker will be the last stage in repairing his feet. Hopefully after 1 or 2 growth cycles the whole hoof should be in good shape again.

Hope to ride again.
All being well, I will ride Sonny again this coming weekend as this lot of rain will be finished by then apparently. Just another short ride along the road in boots. It’s as much as my back can tolerate at this stage anyway. It’s just as well we didn’t go for a longer ride last time because my back is still getting over the ride in a saddle. He would like to get at the cattle in the paddocks over the back fence & along the roadsides but unfortunately he will just have to dream! I’m sure the owners of those cattle don’t want some horse chasing them around!


Here is the link to this week’s album:- http://s340.beta.photobucket.com/user/claireT_2008/library/2013%20%20all%20photos/2013%20February2%20Sonnys%20Feet

 
Nice looking feet.
I like the photos this week. It’s easy to see the fronts are slowly developing quite a nice shape now. Even the backs are beginning to respond to digging out all that excess bar material & doing the bevel under the toe wall too. The length of the back feet from heel to toe has shortened quite a bit too.


Note in this photo above of the RF just how tightly the new growth is coming down from the coronet band now. In the first photo in this post of the LF you can see the new tighter angle is well established now. Hopefuly keeping the toe bevel strong will allow that tighter angle to grow all the way down & eliminate all that toe lamella wedge totally. The heels of this RF do seem to be quite a lot more upright now too.


I tried really hard to work within the software restrictions of the new Photobucket web albums but I still got it wrong even on the 5th attempt to upload & the whole series of photos has come out all back to front with the fronts at the end of the list rather than the beginning. I gave up!  grrrr  >:-[


Saturday, February 9, 2013

GREAT PROGRESS!!


First anniversary of Sonny’s founder in his RF


What a change there has been in the year since! This last week he has been actively trotting here & there with the occasional canter & cavort, all by himself. I think digging those overlaid bars out has really made a huge improvement.
 
 
I’m really happy with the progress showing in Sonny’s feet now. It seems the wet came just at the right time after just the right length of extended dry season. I feel very lucky because things don’t usually go so well for me.


Everything seems to be on track other than the one thing which I have commented on in this particular photo. I’ve been at this place before & it all went to putty. Admittedly it was year 2 of the never ending wet season but that wasn’t the real cause of his founder.

I’m sure his founder was mechanical & the shape of the LF reminds me all too well that we are at that point again except last time it was the RF. It has a bit of heel, deepening collateral grooves between the heels & running out to next to nothing at the frog tip. This time however, he has a much better sole/wall connection with stronger walls. Also this time he no longer has all that ingrown bar material jamming up into his corium & heel cushion.
I wonder if it was all that jammed up bar material that set all this founder & hoof problems in action in the first place a few years ago. Perhaps it all cut into the sole cushion & corium & cut off circulation & set laminitis in motion.


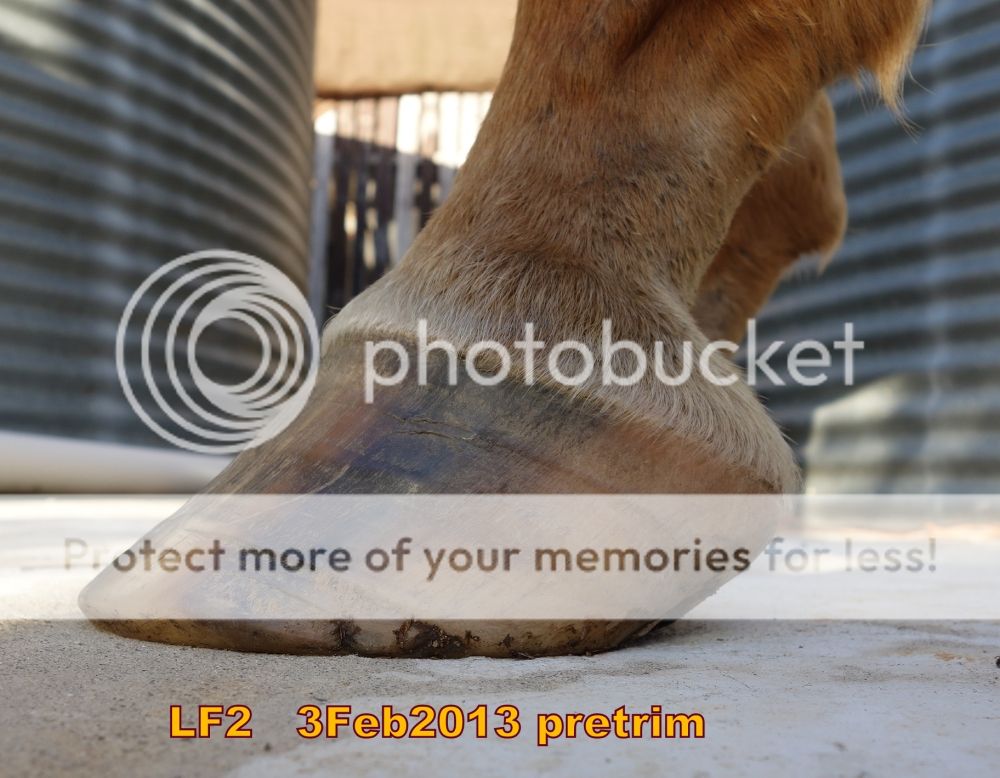
Left Front :- It looks like the wall is really long, standing proud of the sole. But it’s actually that the sole is withdrawing rapidly back to the correct position leaving a large gap between sole/wall connection & the bearing surface of the wall. I think the way things are going most of that long toe will have been removed 3 trims from now. The large gap shows there is no more lamella wedge growing, instead it is a nice tight connection to the P3. Still some general reshaping to stand the whole hoof a little more upright but that too will hurry along in no time.
The toe is coming back better this time. I expect to be making big inroads into that long toe in the next 3 trims. I am leaving as much wall thickness as I feel I can so I don’t leave him walking just on sole. That seems to be a trigger for the sole to run out from under the toe wall. Now there is softer soil, a nice bit gets trapped in the sole helping to hold the bit of depth that has been developed recently.

Also note there are almost no black lines anymore on the sole where the overlaid bars were jamming up into his feet. These last 3 trims I have been aggressively addressing those overlaid bars by digging it all out with the dremel & knife & the results are now obvious.
 
Here are the pretrim photos of both fronts. Note how even they are becoming now. Although the frog on the LF is much longer but hopefully shortening as that hoof gets more upright now.


With him leaping all around obviously feeling good, I am loathe to change the trim at this point but I know I do have to bring the heels down a tad again once the tighter angle has grown down a bit at the toe.
It’s by no means perfect yet. All feet still have big problems to do with the bars mostly along with some heel angle, but also some lingering wall separation, but that too will resolve soon enough.
It’s also time to have a close look at what direction the sole tubules are growing in now. By now a new sole should have grown that should have tubules growing more perpendicular.

The remainder of this week’s photos are found here:-  www.photobucket.com/2013_February_Sonnys_Feet

 
Also this will probably be the last use of Photobucket. They are changing their whole methodology & format to suit facebook & I won’t be able to link to the photos as I have been doing so I will probably move to google, but to view the photos you might find you have to log in unfortunately. Sorry about that. It is a real bone of contention amongst the Photobucket users that the site is changing so dramatically. So far I am lucky in that my photos, posted over the last 5yrs, are still all in the right place in the various forums & blogs but who knows if that will last because many other users have lost their links. It will probably be best if I change the format of my blog posts. Also now that Sonny’s feet are so improved I may not post so often.